-
作者帖子
-
avada 是非常流行的一款 WordPress 商業主題,從初始版本到 3.9.3 。此次 5.0.2 及以上版本的重要更新中,如果沒有帳户和密鑰。則無法導入演示數據。但是大家不要慌。本文給大家幾個破解方法。
方法 1
5.0.2+及以上版本方法。
1:前往您的 phpmyadmin;
2:選擇你的主題安裝數據庫;
3:選擇數據庫下面的數據表 「wp_options」 然後選擇 SQL(打開要運行的 sql 命令)
4:複製粘貼運行下面的代碼:
INSERT INTO <code>wp_options</code> (<code>option_name</code>, <code>option_value</code>, <code>autoload</code>) VALUES
('avada_registration', 'a:1:{s:5:"token";s:10:"1234567890";}', 'yes'),
('avada_registered', '1', 'yes');
方法 2
轉到
themes/Avada/includes/class-avada-product-registration.php
第 209 行更改 $registered = true;
第 215 行更改 $registered = true;
保存, 到激活頁隨便輸入並提交
這樣就開啓 demo 和插件了
方法 3
1. 安裝主題
2. 打開主題 Includes 文件夾並打開 class-avada-envato-api.php 文件
3. 移除下面兩行
$response_code    = wp_remote_retrieve_response_code( $response );
$response_message = wp_remote_retrieve_response_message( $response );
並保存。
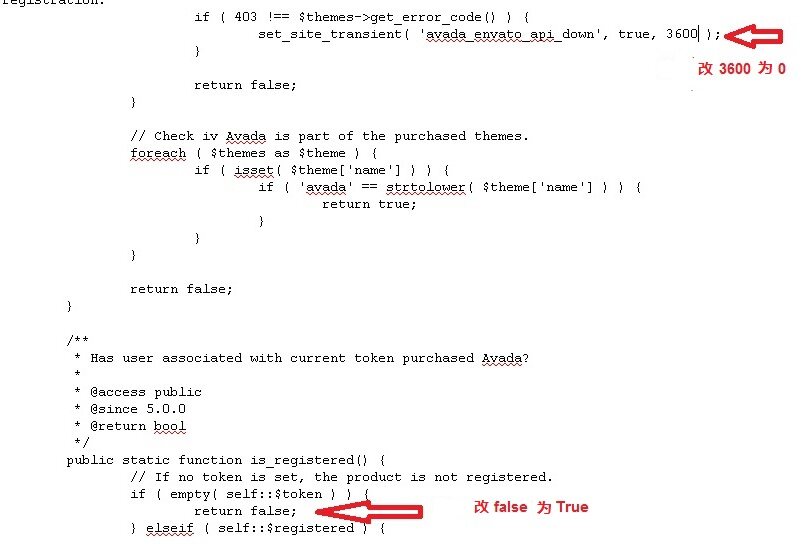
4. 打開 class-avada-product-registration.php
按圖找到代碼並修改,3600 改成 0,
false 改成 true
新 avada5.0.2+導入演示數據 (2016/11/23 更新)
然後去 avada 面板激活頁隨便輸入提交就好了。
2016/11/23 更新
在 avada 5.0.5 版本中,激活方式有一點更改,你只需要編輯 Include 文件夾中的 class-avada-product-registration.php(上面第 4 步),然後返回主題選項,去激活頁什麼都不輸入直接點擊提交就好了。
5.2.2 版本測試成功,可以使用全功能。
includes/lib/inc/class-fusion-product-registration.php 在 305 行 將 false 改為 true.
That』s it!
		// Is the Envato API down?
		if ( get_site_transient( 'fusion_envato_api_down' ) ) {
			return true;
		}

		// Fallback to false.
		return true;
6.0.2 修改位置 296 行內容為下
public function is_registered( $product_id = '' ) { return true; } -
作者帖子
- 哎呀,回覆話題必需登錄。